Author: Olu

  • Peanut Butter Protein Snacks: 10 Easy Ideas for Satisfying Homemade Snacks

    Peanut Butter Protein Snacks: 10 Easy Ideas for Satisfying Homemade Snacks

    There is something especially satisfying about the combination of creamy peanut butter, a little sweetness, and a chewy or crunchy texture. Whether you prefer chocolate-covered treats, soft energy bites, or something you can spread on a slice of toast, peanut butter makes it easy to put together a snack without spending hours in the kitchen.

    These peanut butter protein snacks are ideal when you want something convenient between meals, a make-ahead option for busy days, or a sweet treat that includes more protein than an ordinary cookie or candy bar. Some ideas use Greek yogurt or protein powder to increase the protein content, while others rely on peanut butter, oats, seeds, and everyday ingredients.

    You’ll find no-bake recipes, fruit combinations, freezer-friendly treats, and quick snacks you can assemble in minutes. Many are easy to customize with ingredients you already have in your pantry.

    Why Make Peanut Butter Protein Snacks?

    Peanut butter has a rich, nutty flavor that pairs naturally with oats, bananas, chocolate, yogurt, and seeds. It also provides plant-based protein and predominantly unsaturated fats, making it a useful ingredient in a variety of snacks.

    However, peanut butter alone isn’t necessarily a high-protein snack compared with foods such as Greek yogurt or cottage cheese. If your goal is to increase the protein in each serving, combining it with protein-rich ingredients can make a meaningful difference.

    For example, you can:

    • Mix peanut butter with Greek yogurt for a creamy dip.

    • Combine it with protein powder and oats to make no-bake energy bites.

    • Blend it with milk and a banana for a filling smoothie.

    • Spread it on whole-grain toast and add seeds for extra texture.

    • Pair it with apple slices for a simple snack with no cooking required.

    These combinations offer different textures and flavors, so you can choose something that suits your appetite and available preparation time.

    10 Peanut Butter Protein Snacks to Try

    HIGH-PROTEIN SMOOTHIE RECIPES (WITH VARYING MACRO PROFILES) — Front Porch Nutrition

    Wholesome Apple Slices with Creamy Peanut Butter

    1. No-Bake Peanut Butter Protein Balls

    La receta de bolitas de mantequilla de cacahuate para hacer en 30 minutos | TN

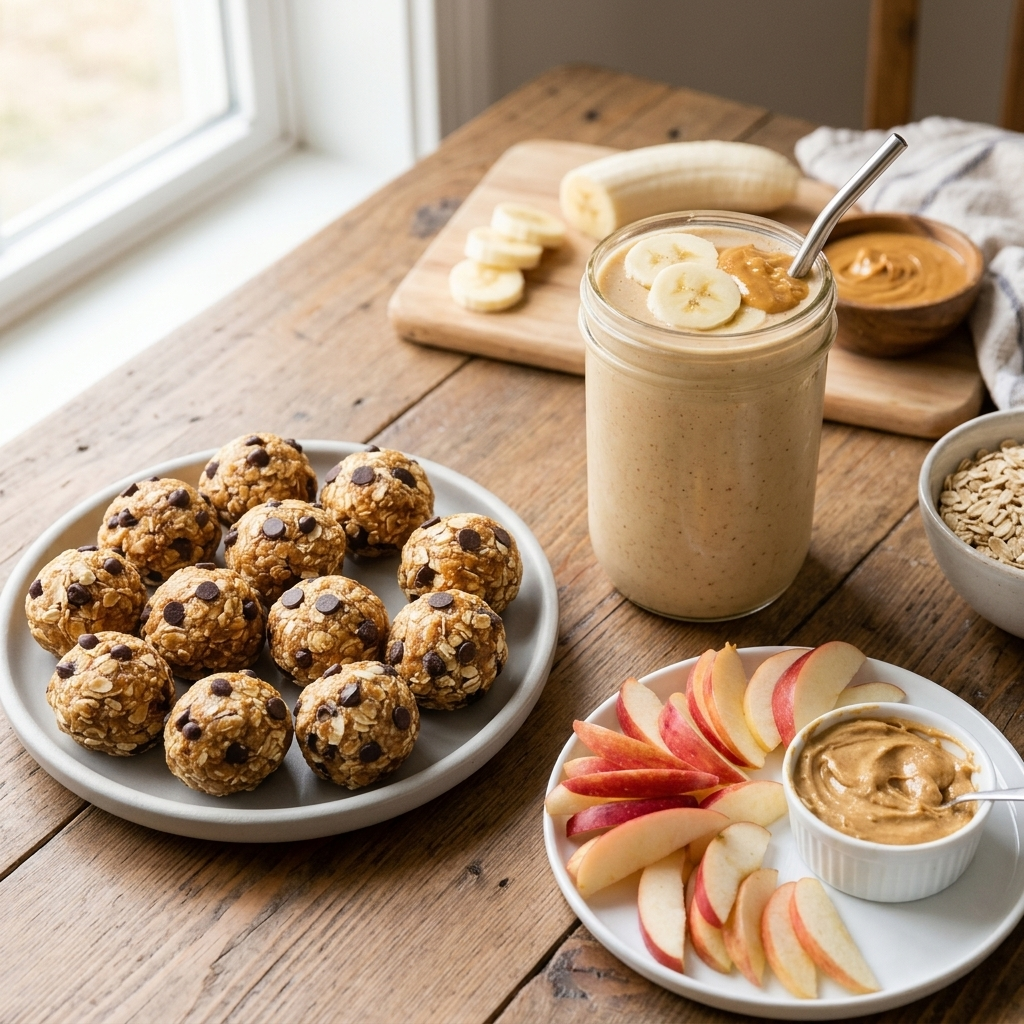
    Peanut butter protein balls are a practical starting point if you want homemade snacks that require no oven. They have a soft, chewy texture, with oats adding a little bite and chocolate chips providing sweetness.

    Ingredients

    • 1 cup rolled oats

    • 1/2 cup creamy peanut butter

    • 1/3 cup vanilla protein powder

    • 3 tablespoons honey or maple syrup

    • 1–3 tablespoons milk, as needed

    • 2 tablespoons mini chocolate chips

    • 1/2 teaspoon vanilla extract, optional

    How to make them

    1. Combine the oats and protein powder in a mixing bowl.

    2. Stir in the peanut butter, honey, and vanilla until the mixture begins to form a thick dough.

    3. Add milk a little at a time if the mixture is too dry to hold together.

    4. Fold in the chocolate chips.

    5. Roll into small balls and refrigerate for approximately 30 minutes to firm up.

    The mixture should hold together when pressed without being so sticky that it coats your hands heavily. If it feels wet, add a little more oats. If it crumbles, add a small amount of milk or peanut butter.

    Make them your own: Add cinnamon, ground flaxseed, or finely chopped nuts. For a different flavor, replace the chocolate chips with raisins or dried cranberries.

    2. Chocolate Peanut Butter Protein Bars

    If you prefer a snack you can cut into portions, homemade protein bars are worth trying. The combination of peanut butter, oats, and chocolate creates a dessert-like flavor without requiring baking.

    Ingredients

    • 1 cup rolled oats

    • 1/2 cup peanut butter

    • 1/3 cup vanilla or chocolate protein powder

    • 1/4 cup honey or maple syrup

    • 2–4 tablespoons milk, as needed

    • 2 tablespoons melted dark chocolate, optional

    Method

    Mix the oats and protein powder, then stir in the peanut butter and sweetener. Add milk gradually until the mixture becomes thick enough to press into a lined loaf pan. Flatten the surface firmly with the back of a spoon.

    Refrigerate until firm, then cut into bars. Add a thin chocolate drizzle if desired and chill again until set.

    For clean slices, use a sharp knife and wipe it between cuts.

    These bars are convenient for preparing several snacks at once. Because protein powders vary in absorbency, adjust the milk gradually rather than adding it all at once.

    3. Greek Yogurt Peanut Butter Dip

    A dip is a good choice when you want something creamy without preparing a full recipe. Greek yogurt supplies much of the protein, while peanut butter adds richness.

    Ingredients

    • 1/2 cup plain Greek yogurt

    • 1 tablespoon peanut butter

    • 1 teaspoon honey, optional

    • A small pinch of cinnamon, optional

    Method

    Stir everything together in a small bowl until smooth. If the peanut butter is too thick to mix easily, let it soften at room temperature briefly before combining it with the yogurt.

    Serve with apple slices, strawberries, banana pieces, or whole-grain crackers.

    For a chocolate variation, mix in a little unsweetened cocoa powder. Add a small splash of milk if you prefer a thinner dip.

    Keep the dip refrigerated until serving, and return leftovers to the refrigerator promptly. This is a particularly useful option when you want a protein-rich snack without using protein powder.

    4. Peanut Butter Banana Smoothie

    When a drink is easier than a snack you need to chew, a peanut butter banana smoothie is an excellent option. Banana contributes natural sweetness and a creamy consistency, while peanut butter adds a roasted, nutty flavor.

    Ingredients

    • 1 medium banana

    • 1 tablespoon peanut butter

    • 3/4 cup milk or unsweetened soy milk

    • 1/4 cup plain Greek yogurt, optional

    • 2–3 ice cubes

    • 1 tablespoon rolled oats, optional

    Method

    Add the ingredients to a blender and blend until smooth. If the smoothie is too thick, add more milk a little at a time. For a thicker texture, use a frozen banana.

    Greek yogurt or soy milk can increase the protein content, depending on the product you choose. If you want even more protein, you can add a serving of protein powder, following the package directions.

    This smoothie works for breakfast, an afternoon snack, or a convenient option after physical activity. Remember that a large smoothie can be more substantial than a typical snack, so adjust the serving to your appetite.

    5. Apple Slices with Peanut Butter

    Organic Apples and Peanut Butter

    Sometimes the simplest snacks are the easiest to repeat. Crisp apple slices and peanut butter require almost no preparation, and their contrasting textures make a satisfying combination.

    Ingredients

    • 1 medium apple

    • 1–2 tablespoons peanut butter

    • A sprinkle of cinnamon, optional

    • 1 teaspoon chopped peanuts or pumpkin seeds, optional

    Method

    Wash the apple, remove the core, and cut it into wedges. Serve with peanut butter for dipping, or spread a thin layer directly onto each slice.

    For extra crunch, sprinkle with chopped peanuts or seeds. If you want a slightly sweeter variation, add a few raisins.

    This snack does not require protein powder, refrigeration during preparation, or special equipment. However, peanut butter portions can add up quickly, so use the amount that suits your appetite and dietary needs.

    6. Chocolate Peanut Butter Protein Cups

    These little cups are ideal for anyone who enjoys the combination of chocolate and peanut butter. A chocolate shell surrounds a creamy peanut butter filling, creating a treat that feels more like candy than a conventional protein snack.

    Ingredients

    • 100 g dark chocolate

    • 1/4 cup peanut butter

    • 2 tablespoons vanilla protein powder, optional

    • 1–2 teaspoons honey or maple syrup, optional

    Method

    1. Melt the chocolate gently in a microwave-safe bowl using short intervals, stirring between each one.

    2. Spoon a little chocolate into the bottom of small paper or silicone liners.

    3. Chill until the chocolate begins to set.

    4. Mix the peanut butter with the protein powder and sweetener, if using.

    5. Add a small portion of the filling to each cup, then cover with the remaining melted chocolate.

    6. Refrigerate until completely firm.

    Use a small amount of filling in each cup to make sealing the edges easier. If the filling becomes too stiff after adding protein powder, mix in a little more peanut butter.

    Store the cups in the refrigerator. Because these contain chocolate, they may soften at warm room temperatures.

    7. Peanut Butter Overnight Oats

    Healthy Breakfast Overnight Oats Oatmeal

    Overnight oats are useful when you want to prepare your snack the night before. As the oats soak, they soften and absorb the liquid, creating a creamy mixture with very little morning preparation.

    Ingredients

    • 1/2 cup rolled oats

    • 1/2 cup milk or unsweetened soy milk

    • 1/4 cup plain Greek yogurt

    • 1 tablespoon peanut butter

    • 1 teaspoon chia seeds, optional

    • Banana slices or berries, for topping

    Method

    Combine the oats, milk, yogurt, peanut butter, and chia seeds in a jar or covered container. Stir thoroughly, cover, and refrigerate overnight.

    In the morning, stir again and add a splash of milk if the mixture is too thick. Finish with banana slices or berries.

    For a chocolate version, add a teaspoon of cocoa powder. For more crunch, sprinkle chopped peanuts on top immediately before eating.

    Keep the container refrigerated and use clean utensils when serving. The oats should soften overnight, although the final consistency will depend on the oats, liquid, and yogurt you use.

    8. Peanut Butter Protein Yogurt Bark

    Frozen yogurt bark offers a refreshing alternative to bars and energy bites. It breaks into irregular pieces, so it is easy to portion and customize with different toppings.

    Ingredients

    • 1 cup plain Greek yogurt

    • 2 tablespoons peanut butter

    • 1 teaspoon honey, optional

    • 2 tablespoons mini chocolate chips

    • A few sliced strawberries or banana pieces

    Method

    Line a small tray with parchment paper. Spread the yogurt into a thin, even layer.

    Warm the peanut butter slightly if needed, then drizzle it over the yogurt. Use a toothpick or the tip of a knife to create swirls. Scatter the chocolate chips and fruit over the surface.

    Freeze until firm, then break into pieces.

    Because frozen yogurt softens quickly, serve the bark straight from the freezer. Store any remaining pieces in a sealed freezer-safe container.

    For the best texture, avoid making the yogurt layer too thick. A thinner layer is easier to break and eat.

    9. Peanut Butter Protein Pudding

    If you enjoy spoonable snacks, peanut butter pudding is another simple option. Greek yogurt creates a creamy base, and peanut butter gives it a rich flavor.

    Ingredients

    • 3/4 cup plain Greek yogurt

    • 1 tablespoon peanut butter

    • 1–2 teaspoons cocoa powder, optional

    • 1 teaspoon honey or maple syrup, optional

    • 1–2 teaspoons milk, as needed

    Method

    Stir the yogurt and peanut butter together until smooth. Add cocoa powder for a chocolate variation and sweeten to taste. If the mixture is too thick, stir in a little milk.

    Refrigerate briefly if you prefer a colder, firmer pudding. Top with a few chopped peanuts or chocolate shavings just before serving.

    If you want to add protein powder, begin with a small amount and adjust the milk as needed. Too much powder can make the pudding dry or chalky.

    This is a flexible snack that can be prepared in a few minutes and customized without using an oven.

    10. Peanut Butter Banana Toast

    Peanut butter banana toast is a quick option when you want something more substantial than a handful of nuts. Toasted whole-grain bread gives you a crisp base, while the peanut butter and banana provide a creamy, sweet topping.

    Ingredients

    • 1 slice whole-grain bread

    • 1 tablespoon peanut butter

    • 1/2 banana, sliced

    • A pinch of cinnamon

    • 1 teaspoon chia seeds, optional

    Method

    Toast the bread until golden and crisp. Spread the peanut butter over the warm toast, arrange the banana slices on top, and finish with cinnamon or chia seeds.

    For extra protein, serve it with a small bowl of Greek yogurt or a glass of milk. You can also sprinkle chopped peanuts over the banana for more crunch.

    Eat soon after assembling to enjoy the contrast between the warm toast and soft toppings.

    How to Make Peanut Butter Snacks Higher in Protein

    Not every snack containing peanut butter is automatically high in protein. The amount depends on the ingredients, portion size, and recipe.

    If you’re trying to increase the protein content of your homemade snacks, these combinations are useful starting points.

    Ingredient How to use it
    Greek yogurt Make creamy dips, puddings, and overnight oats.
    Protein powder Add to bars, energy bites, or smoothies.
    Soy milk Blend into smoothies or soak oats.
    Chia seeds Stir into overnight oats or sprinkle over toast.
    Peanuts Add crunch to yogurt, bars, and pudding.
    Whole-grain oats Combine with peanut butter to make bars and bites.

    You don’t need to use all these ingredients in one recipe. Choose one or two additions that suit the snack you are preparing.

    For a quick, protein-focused option, Greek yogurt paired with peanut butter is a useful combination. For a portable snack, protein balls or bars are easier to portion in advance.

    Keep in mind that nutritional values vary by brand and serving size. If you want to track your protein intake, calculate the amount from the actual ingredients you use rather than relying on a generic estimate.

    Tips for Preparing Peanut Butter Protein Snacks Ahead of Time

    Preparing snacks in advance can make busy weekdays easier. However, different recipes need different storage methods.

    • Make a batch of energy bites. Roll several portions at once and refrigerate them in a sealed container.

    • Freeze extra protein bars. Separate individual portions with parchment paper so you can remove them without breaking the bars.

    • Prepare overnight oats in individual jars. Measure the ingredients into separate containers to make breakfast or snacking more convenient.

    • Keep fresh fruit separate. Cut apples and bananas close to serving time when possible, as they can brown after exposure to air.

    • Portion chocolate treats. Small containers help keep the servings organized and make them easier to grab.

    Snacks containing yogurt or other perishable ingredients should be refrigerated promptly. Do not leave them at room temperature for extended periods. When storing homemade snacks, follow appropriate food-safety guidance and discard anything that smells, looks, or feels unusual.

    Common Mistakes to Avoid

    Even simple no-bake recipes can be frustrating if the ingredients do not combine properly. A few adjustments can improve the result.

    Adding too much protein powder. Protein powder absorbs liquid, and different brands behave differently. Add it gradually and adjust the wet ingredients to achieve the intended consistency.

    Using peanut butter that is too dry. Some natural peanut butters separate, while others are thick and difficult to mix. Stir separated peanut butter thoroughly before measuring, and adjust the recipe if the mixture will not hold together.

    Making the mixture too wet. If protein balls or bars feel sticky and loose, add small amounts of oats until the mixture is easier to shape.

    Expecting every snack to taste like dessert. Protein powder, yogurt, and other additions can change the flavor. Start with modest amounts of cocoa, cinnamon, vanilla, or sweetener, then adjust to your preference.

    Ignoring portion sizes. Peanut butter is energy-dense, so a few generous spoonfuls can add up. Choose a portion that fits your appetite and nutritional needs rather than assuming every homemade snack is automatically low in calories.

    Frequently Asked Questions

    Are peanut butter protein snacks healthy?

    They can be part of a balanced diet. Peanut butter provides protein and unsaturated fats, while ingredients such as oats, fruit, and yogurt add other nutrients. The overall nutritional value depends on the recipe, serving size, and added sweeteners.

    Can I make peanut butter protein snacks without protein powder?

    Yes. Use Greek yogurt, milk, soy milk, oats, and peanuts in suitable combinations. Protein powder is convenient, but it is not essential for every snack. Keep in mind that a recipe made without protein powder may contain less protein than one made with it.

    Which peanut butter protein snacks are best for meal prep?

    No-bake protein balls, protein bars, overnight oats, and frozen yogurt bark are useful options. Prepare them in individual portions and follow the appropriate refrigeration or freezing guidance for their ingredients.

    Can I make these snacks vegan?

    Many can be adapted. Use plant-based milk or soy milk, dairy-free yogurt, and maple syrup instead of honey. Choose a vegan protein powder and check that any chocolate or other packaged ingredients meet your requirements.

    What can I use instead of peanut butter?

    Almond butter or cashew butter may work in many recipes. For a peanut-free option, sunflower seed butter is another possibility. Check product labels for allergen information, especially if you are preparing snacks for children or sharing them with others.

    Do peanut butter protein snacks need to be refrigerated?

    It depends on the ingredients. Plain peanut butter and some dry snacks may be stored differently from snacks containing yogurt, milk, or fresh fruit. Refrigerate perishable preparations promptly and follow appropriate food-safety guidance.

    Final Thoughts

    Peanut butter protein snacks can be as simple as apple slices with peanut butter or as prepared as homemade chocolate protein bars. The best choice depends on how much time you have, which ingredients you enjoy, and whether you need a quick bite or something more substantial.

    Start with one or two recipes, such as no-bake protein balls and Greek yogurt peanut butter dip. Once you know which combinations you like, experiment with bananas, oats, chocolate, seeds, and other ingredients to create your own variations.

    The goal is to make satisfying snacks that are practical to prepare and enjoyable to eat.
  • Sweet Potato Casserole with Brown Sugar Pecan Topping

    Sweet Potato Casserole with Brown Sugar Pecan Topping

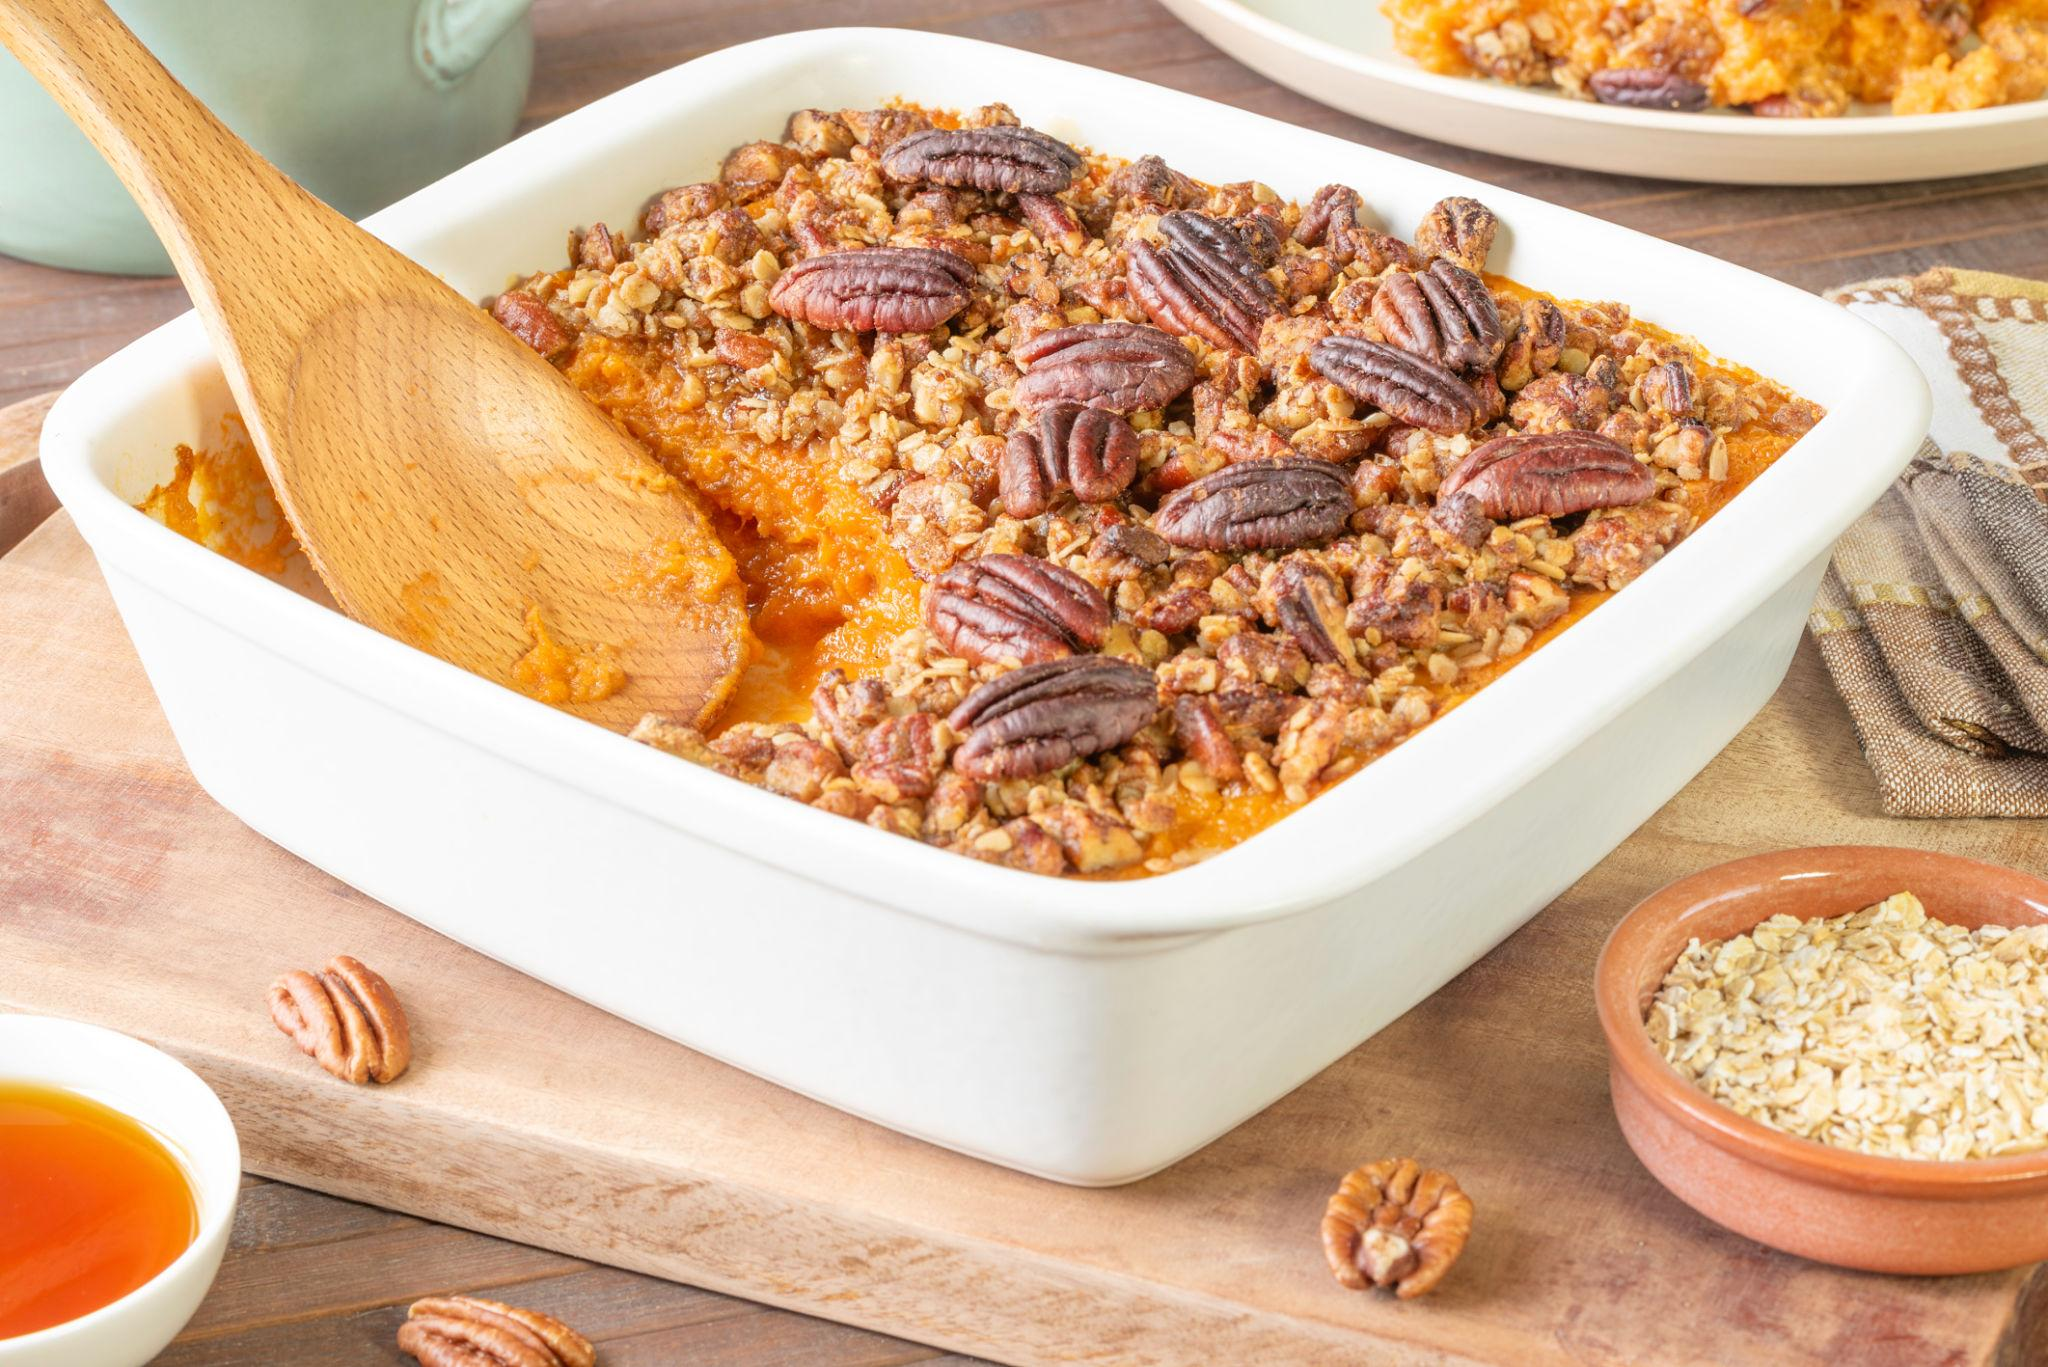
    Sweet potato casserole brings together two textures that make a comforting side dish hard to resist: a soft, creamy sweet potato filling and a crisp, buttery topping. The potatoes have a naturally sweet, earthy flavor, while brown sugar, cinnamon, vanilla, and toasted pecans add warmth and a little crunch to every serving.

    This sweet potato casserole recipe is an excellent choice for Thanksgiving, Christmas, Sunday dinner, or any meal when you want a side dish that feels a little more special than ordinary mashed vegetables. It uses fresh sweet potatoes and a simple brown sugar pecan topping, with enough flexibility to suit different tastes. If you prefer the traditional marshmallow version, you can easily adapt the recipe.

    The secret to a good casserole is balance. Sweet potatoes already contain natural sugars, so you don’t need to overwhelm them with extra sweetness. A little butter adds richness, milk helps create a smooth texture, and a pinch of salt keeps the flavors from becoming flat. On top, a crumbly pecan mixture creates a pleasant contrast with the tender filling. This combination of creamy potatoes and crunchy topping is a familiar feature of classic sweet potato casseroles.

    Whether you’re preparing a holiday menu or looking for a comforting vegetable side, this recipe gives you a dependable starting point, along with practical tips for preparing it ahead, adjusting the sweetness, and getting the topping just right.

    Sweet Potato Casserole Recipe at a Glance

    Prep time
    20 minutes
    Cook time
    45–50 minutes
    Total time
    About 1 hr 10 min
    Servings
    8

    ♧ Difficulty: Easy

    Best for holiday dinners, family meals, and make-ahead sides.

    Ingredients for Sweet Potato Casserole

    This recipe uses everyday ingredients that work together to create a smooth filling and a crisp, nutty topping. Measure the ingredients before you begin so you can prepare the casserole without rushing.

    For the sweet potato filling

    • 3 pounds fresh sweet potatoes: About five medium potatoes, peeled and cut into evenly sized chunks.

    • 4 tablespoons unsalted butter: Adds richness and helps the filling feel smooth.

    • ½ cup whole milk: Loosens the mashed potatoes and creates a softer texture.

    • ⅓ cup packed brown sugar: Sweetens the filling without overpowering the natural flavor of the potatoes.

    • 2 large eggs: Help the filling set as it bakes, giving it a cohesive, casserole-like texture.

    • 1 teaspoon vanilla extract: Adds a gentle, warm aroma.

    • ½ teaspoon ground cinnamon: Provides a subtle spice that complements the sweet potatoes.

    • ½ teaspoon salt: Balances the sweetness and brings out the other flavors.

    For the brown sugar pecan topping

    • ½ cup all-purpose flour: Helps form the crumbly topping.

    • ½ cup packed brown sugar: Creates a sweet, caramel-like flavor as the topping bakes.

    • 4 tablespoons unsalted butter, melted: Binds the topping ingredients and encourages browning.

    • ¾ cup chopped pecans: Add a nutty flavor and crunchy texture.

    • ¼ teaspoon salt: Keeps the topping from tasting overly sweet.

    The brown sugar and pecans create a crisp topping that contrasts with the soft potato filling. Similar combinations are commonly used in pecan-topped sweet potato casserole recipes.

    How to Make Sweet Potato Casserole Step by Step

    How To Peel and Chop Sweet Potatoes: 3 Ways | The Kitchn

    Step 1: Prepare the sweet potatoes

    Wash and peel the sweet potatoes, then cut them into evenly sized chunks. Keeping the pieces similar in size helps them cook at approximately the same rate.

    Place the potatoes in a large saucepan and cover them with water. Bring the water to a boil, then reduce the heat and simmer until the potatoes are very tender, usually around 15–20 minutes, depending on the size of the pieces.

    Check them with a fork. It should slide easily into the thickest pieces without resistance. If the centers are still firm, continue cooking for a few minutes.

    Drain the potatoes thoroughly. Excess water can make the filling loose and watery, so allow the drained potatoes to sit briefly in the colander before mashing.

    Step 2: Mash the potatoes until smooth

    Mashed Sweet Potatoes in a Mixing Bowl

    Transfer the drained sweet potatoes to a large mixing bowl. Mash them with a potato masher until most of the lumps have disappeared.

    For a rustic casserole, a few small lumps are perfectly acceptable. If you prefer a smoother, more uniform filling, use a hand mixer on low speed after the potatoes have softened completely.

    Avoid adding all the milk at once if your sweet potatoes seem particularly moist. Start with most of the measured milk, then add the remainder as needed to reach a thick, creamy consistency.

    Step 3: Mix the filling

    Add the butter, milk, brown sugar, cinnamon, vanilla extract, and salt to the mashed sweet potatoes. Stir until the mixture is evenly combined.

    Let the potatoes cool slightly before adding the eggs. This helps prevent the eggs from cooking prematurely when they touch the warm mixture.

    Beat in the eggs until no streaks remain. The filling should look creamy and hold its shape when spread with a spoon, rather than running like a thin purée.

    Taste a small spoonful before transferring the mixture to the baking dish. If you prefer a less-sweet casserole, keep the sugar as measured or reduce it slightly next time. If you enjoy a dessert-like filling, a little additional brown sugar is an option, but remember that the topping will add sweetness too.

    Step 4: Prepare the pecan topping

    Best Sweet Potato Casserole Recipe

    In a separate bowl, combine the flour, brown sugar, melted butter, and salt. Stir until the mixture resembles damp crumbs. Fold in the chopped pecans so they are distributed throughout.

    The mixture should form small clumps when pressed between your fingers. If it looks powdery, mix it a little longer so the butter coats the dry ingredients. If it seems too wet, add a small sprinkle of flour.

    Don’t stir the topping into the potato mixture. Keeping the layers separate is what creates the contrast between the soft filling and the crunchy surface.

    Step 5: Assemble the casserole

    Preheat your oven to 350°F (175°C). Lightly butter a 9-by-13-inch baking dish or use a similarly sized casserole dish with enough room for the filling and topping.

    Spread the sweet potato mixture evenly into the dish. Smooth the surface with the back of a spoon or a spatula, paying attention to the corners so the filling is level.

    Scatter the pecan topping over the entire surface. Aim for an even layer rather than a thick pile in the center. This helps the topping brown more consistently and gives each serving some of the crunchy mixture.

    Step 6: Bake until set and golden

    Brown Sugar-Pecan Sweet Potato Casserole - Recipe from Price Chopper

    Place the casserole in the preheated oven and bake for approximately 25–35 minutes, or until the center is hot and the topping is golden brown. The exact time will depend on the depth of the dish and the temperature of the filling before baking.

    Look for a topping that feels dry and crisp on the surface, with lightly browned pecans. The filling should look set rather than liquid in the center.

    If the pecans begin browning too quickly, loosely cover the dish with foil for the remainder of the baking time. Let the casserole rest for about 5–10 minutes before serving. This brief rest helps the filling settle and makes it easier to scoop neat portions.

    Tips for the Best Sweet Potato Casserole

    A few small choices can make a noticeable difference in the final dish.

    • Choose firm, fresh sweet potatoes. Avoid potatoes with soft, wet, or visibly spoiled areas. Similar-sized potatoes also make preparation easier.

    • Drain thoroughly. Water left on the potatoes can dilute the flavor and prevent the filling from setting as expected.

    • Adjust the sweetness thoughtfully. Sweet potatoes vary naturally in sweetness, so taste the filling before adding more sugar.

    • Keep the topping separate. Add it just before baking for the best chance of achieving a crumbly surface.

    • Don’t overmix. Mash until the texture suits your preference, but avoid turning the potatoes into a gluey paste.

    • Watch the pecans near the end. Nuts can darken quickly, particularly if the oven runs hot.

    • Allow a short resting period. Serving immediately from the oven can make the filling seem looser than it will after a few minutes.

    Sweet Potato Casserole Variations

    One of the best things about sweet potato casserole is how easily you can change the topping and flavor profile without rebuilding the entire recipe.

    Old-Fashioned Sweet Potato Casserole Recipe

    1. Sweet potato casserole with marshmallows

    If you prefer a traditional marshmallow topping, leave off the pecan mixture or use a smaller amount. Add miniature marshmallows during the final 10–15 minutes of baking, watching closely until they puff and turn golden. Marshmallows brown quickly, so don’t leave the dish unattended.

    Sweet Potato Casserole with Butter Pecan Crumble Topping Recipe | Samsung Food App

    2. Cinnamon pecan casserole

    Increase the cinnamon slightly in the filling or add a small pinch of nutmeg. This version emphasizes warm spice without requiring a sweeter filling.

    Sweet Potato Casserole Recipe - Soom Foods

    3. Oat and walnut topping

    Replace some of the pecans with chopped walnuts and add a few tablespoons of rolled oats to the topping. The oats create a more substantial crumble. For a gluten-free version, use certified gluten-free oats and a suitable flour alternative.

    Brown Butter Sweet Potatoes with Orange and Pecans - Finlandia Cheese

    4. Orange and sweet potato casserole

    Add a little finely grated orange zest to the filling for a fresh citrus note. Start with about ½ teaspoon and adjust to taste. Avoid adding too much juice, which could make the mixture watery.

    If you’re serving guests with allergies, remember that pecans and walnuts are tree nuts. Choose a topping that suits your guests’ dietary needs and check packaged ingredients when necessary.

    What to Serve with Sweet Potato Casserole

    Sweet potato casserole has a rich, sweet flavor, so it pairs especially well with savory main dishes and vegetables that bring freshness or a little contrast to the plate.

    • Roast chicken: A savory, golden roast chicken complements the creamy potatoes without competing with their sweetness.

    • Roast turkey: A classic holiday pairing, particularly when served with gravy and stuffing.

    • Baked ham: The salty, savory flavor of ham works well with the brown sugar pecan topping.

    • Green beans: Steamed or roasted green beans add color and a fresh vegetable element.

    • Mac and cheese: A comforting choice for family dinners, potlucks, and holiday spreads.

    • Roasted vegetables: Brussels sprouts, carrots, or broccoli offer different textures and flavors alongside the casserole.

    For a balanced holiday menu, serve a moderate portion of casserole alongside a savory protein and at least one vegetable that isn’t sweetened. That way, the meal feels varied rather than dominated by rich side dishes.

    Can You Make Sweet Potato Casserole Ahead of Time?

    Yes. Sweet potato casserole is a useful make-ahead dish, especially when you have several recipes to prepare for a gathering. Preparing the filling in advance saves time on the day you plan to serve it.

    To prepare ahead, cook and mash the sweet potatoes, mix the filling, and spread it into the baking dish. Allow the mixture to cool promptly, cover it, and refrigerate it. Store the pecan topping separately in a covered container.

    You can assemble the casserole up to one day ahead for this recipe. When you’re ready to bake, add the topping and place the dish in the oven. A chilled casserole may need additional baking time, so check that the center is thoroughly hot before serving. This approach is consistent with make-ahead guidance from established recipe sources.

    For the best texture, avoid adding the pecan topping too early. Keeping it separate helps prevent moisture from the filling from softening the crumbs before baking.

    How to Store and Reheat Leftovers

    Allow leftover casserole to cool slightly, then transfer it to shallow, covered containers and refrigerate within two hours of cooking. Keep the refrigerator at 40°F (4°C) or below.

    • Refrigerator: Store leftovers for 3–4 days.

    • Freezer: Freeze in a suitable airtight container for about 2–3 months for best quality. The filling may become slightly softer after thawing, and the pecan topping may lose some crispness.

    • Oven reheating: Place a portion in an oven-safe dish, cover loosely with foil, and heat at 325–350°F (165–175°C) until the center reaches 165°F (74°C).

    • Microwave reheating: Heat individual portions in short intervals, stirring or checking the center as needed, until thoroughly hot.

    For food safety, refrigerate promptly rather than leaving the casserole at room temperature for extended periods. Reheated leftovers should reach 165°F (74°C). If you freeze the casserole, thaw it in the refrigerator rather than on the counter.

    Frequently Asked Questions

    1. Is sweet potato casserole a side dish or a dessert?

    It can be either, depending on how it is prepared and served. A moderately sweet casserole with a pecan topping is commonly served as a side dish. A sweeter version with marshmallows can taste more like a dessert, especially when served in generous portions.

    2. Should I boil or bake the sweet potatoes first?

    Both methods work. Boiling peeled, cubed potatoes is convenient and relatively quick. Baking whole sweet potatoes can produce a concentrated flavor because the potatoes aren’t simmering in water. If you bake them, let them cool enough to handle before removing the skins and mashing the flesh.

    3. Why is my sweet potato casserole watery?

    The most common reasons include potatoes that weren’t drained thoroughly, too much milk, or a filling that hasn’t finished baking. Drain the cooked potatoes well and add milk gradually. If the casserole is already in the oven, allow it more time to cook while monitoring the topping.

    4. Can I make sweet potato casserole without eggs?

    Yes. Eggs help the filling set, but you can omit them if necessary. The result will generally be softer and less structured. You may need to adjust the milk and baking time to suit the consistency of the mixture. If you’re cooking for someone with an egg allergy, check all other ingredients for potential allergens as well.

    5. Can I use canned sweet potatoes?

    Yes, although the texture and sweetness may differ from fresh potatoes. Drain them thoroughly and check whether they contain added syrup or sugar before preparing the filling. If they’re already sweetened, reduce the brown sugar accordingly. Fresh sweet potatoes are a useful choice when you want greater control over the final flavor.

    6. How do I keep the pecan topping crunchy?

    Mix the topping until it forms crumbs, distribute it evenly over the filling, and bake until golden. Avoid covering the casserole tightly while it is still hot, because trapped steam can soften the topping. If preparing the casserole ahead, keep the topping separate until you’re ready to bake.

    7. Can I make sweet potato casserole without nuts?

    Yes. Replace the pecans with a crumb topping made from flour, brown sugar, and butter, or use rolled oats if appropriate for your dietary requirements. For a nut allergy, check the ingredient labels and prevent cross-contact with nuts during preparation.

    8. How can I tell when sweet potato casserole is done?

    The topping should be golden and the filling should be hot and set rather than liquid in the center. If you used eggs, the center should no longer look raw or runny. For reliable results, check the center with a food thermometer when appropriate, especially if the casserole has been refrigerated before baking.

    Final Thoughts

    Sweet potato casserole is a practical way to turn a familiar vegetable into a warm, satisfying side dish. The combination of creamy mashed sweet potatoes, brown sugar, cinnamon, and a crunchy pecan topping offers a pleasing balance of texture and flavor without requiring complicated techniques.

    For the best results, drain the potatoes well, keep the filling thick enough to hold its shape, and watch the topping as it browns. You can prepare the filling ahead, switch to marshmallows if that’s what your family prefers, or experiment with citrus and warm spices.

    Serve it with roast chicken, turkey, ham, or your favorite savory main dish for a meal that feels complete. Once you have the basic method down, it’s easy to adapt the casserole to different occasions and personal tastes.

  • Sweet Potato Burger Bowl (With Ground Beef)

    Sweet Potato Burger Bowl (With Ground Beef)

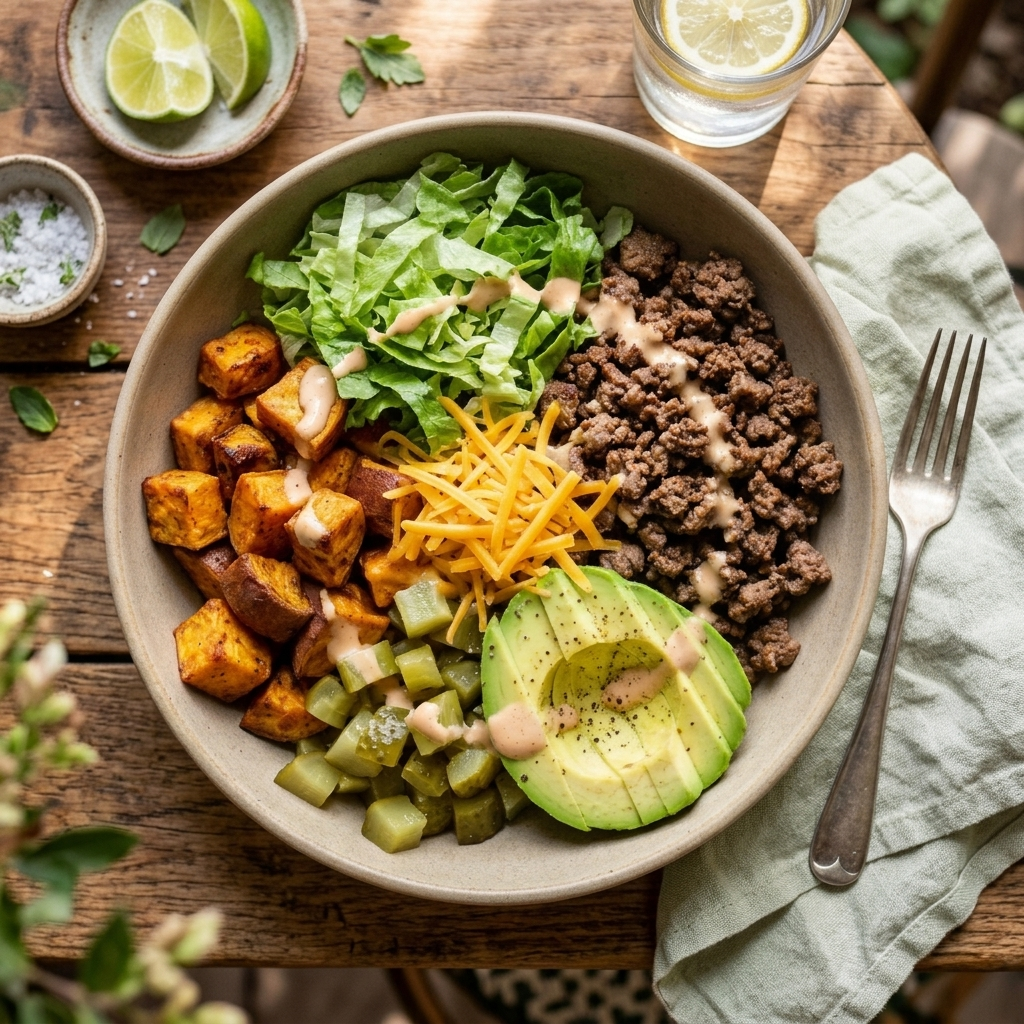
    If you like the flavor of a good burger but don’t always want the bun, the sweet potato burger bowl solves a real weeknight problem: it gives you all that seasoned, savory ground beef flavor with roasted sweet potatoes standing in for the bread and fries, all built into one bowl you can eat with a fork. It’s quick enough for a Tuesday night, naturally gluten-free, and flexible enough to dress up with whatever toppings you have on hand — cheese, pickles, avocado, a fried egg, a drizzle of burger sauce.

    This recipe walks through how to roast the sweet potatoes so they turn tender and lightly caramelized rather than mushy, how to season and brown the ground beef so it stays juicy instead of dry and crumbly, and how to layer everything into a bowl that eats like a burger without needing a single piece of bread. You’ll also find substitution ideas, make-ahead tips, and answers to the questions that tend to come up the first time someone makes this dish.

    What Makes This Bowl Work

    The appeal of a burger bowl comes down to contrast. Roasted sweet potato cubes bring a soft, slightly sweet base with caramelized edges where they’ve touched the hot pan. Seasoned ground beef adds savory, slightly smoky depth, especially if you season it the way you would a classic burger — garlic powder, onion powder, smoked paprika, salt, and pepper. Then the toppings do the rest of the work: something crunchy, something creamy, something tangy. Shredded lettuce or cabbage for crunch, shredded cheese or a dollop of sour cream for richness, diced pickles or pickled red onion for acidity.

    Because the components are cooked and assembled separately, this isn’t really one recipe so much as three short ones that come together at the end — roasted sweet potatoes, cooked ground beef, and a simple sauce or topping bar. That structure also makes it easy to prep ahead or split tasks if you’ve got help in the kitchen.

    Ingredients and What Each One Does

    For the sweet potatoes:

    • 2 large sweet potatoes (about 2 pounds), peeled and cut into ¾-inch cubes
    • 2 tablespoons olive oil
    • ½ teaspoon salt
    • ¼ teaspoon smoked paprika
    • ¼ teaspoon garlic powder

    Cutting the sweet potatoes into even, fairly small cubes matters more than people expect — uneven pieces mean some cubes burn while others stay underdone. Smoked paprika isn’t essential, but it adds a faint char-like flavor that pairs well with the beef.

    For the ground beef:

    • 1 pound ground beef (80/20 or 85/15 works well; leaner beef can turn dry without added fat)
    • 1 teaspoon garlic powder
    • 1 teaspoon onion powder
    • ½ teaspoon smoked paprika
    • ½ teaspoon salt
    • ¼ teaspoon black pepper
    • Optional: a splash of Worcestershire sauce for extra depth

    The fat content in the beef matters here since there’s no bun to soak up extra moisture or grease — a slightly fattier blend keeps the meat tender, while very lean beef can taste chalky in a bowl format.

    Suggested toppings (choose a mix, not all at once):

    • Shredded lettuce or shredded cabbage
    • Shredded cheddar or crumbled feta
    • Diced pickles or pickled red onion
    • Sliced avocado or guacamole
    • Halved cherry tomatoes
    • Sour cream, mayonnaise, or a simple burger sauce (mayo, ketchup, a little mustard, and a dash of pickle juice stirred together)

    Ingredient Substitutions and Variations

    Ground turkey or chicken can replace the beef for a lighter version, though since poultry has less natural fat, adding a teaspoon of olive oil to the pan helps prevent it from drying out as it cooks. Ground turkey and chicken need to reach an internal temperature of 165°F (74°C), compared to the lower-risk thresholds used for ground beef, so cook it through until no pink remains and juices run clear.

    Plant-based ground “meat” works in this format too — follow the package instructions for browning time, since plant-based products often cook faster than beef.

    White or russet potatoes can stand in for sweet potatoes if you prefer a more neutral, starchy base, though you’ll lose the natural sweetness that balances the savory beef and tangy toppings.

    Low-carb version: skip the sweet potato altogether and build the bowl on a bed of roasted cauliflower or shredded lettuce instead, keeping the seasoned beef and toppings the same.

    Spicier version: add a pinch of cayenne or chili powder to the beef seasoning, and top with pickled jalapeños.

    Step-by-Step Instructions

    1. Roast the sweet potatoes.
    Preheat your oven to 400°F (200°C). Toss the cubed sweet potatoes with olive oil, salt, smoked paprika, and garlic powder directly on a sheet pan, then spread them into a single layer with a little space between pieces — overcrowding traps steam and keeps them from browning. Roast for 25 to 30 minutes, flipping halfway through, until the edges are golden brown and a fork slides in easily. You’re looking for cubes that are tender all the way through but still hold their shape, with some caramelized, slightly crisp edges where they touched the pan.

    2. Brown the ground beef.
    While the sweet potatoes roast, heat a large skillet over medium-high heat. Add the ground beef and break it up with a spatula as it cooks. Once it’s no longer pink on the outside, stir in the garlic powder, onion powder, smoked paprika, salt, pepper, and Worcestershire sauce if using. Continue cooking, stirring occasionally, until the beef is fully browned and any released liquid has mostly evaporated — this usually takes 8 to 10 minutes total. Ground beef should reach an internal temperature of 160°F (71°C), which you can check with an instant-read thermometer if you’re unsure; by that point, the meat will look uniformly brown with no pink remaining and will have a slightly firm, crumbly texture.

    If the pan looks greasy once the beef is cooked, tilt it and spoon off excess fat before assembling the bowls — a little fat carries flavor, but too much will make the bowls feel heavy rather than balanced.

    3. Prep your toppings while everything cooks.
    Use the time the sweet potatoes and beef are cooking to shred lettuce, dice pickles, slice avocado, or stir together a quick burger sauce. Having toppings ready means you can assemble bowls the moment the sweet potatoes come out of the oven, while everything is still warm.

    4. Assemble the bowls.
    Divide the roasted sweet potatoes among bowls as the base layer, top with a portion of the seasoned ground beef, and finish with your chosen toppings. Drizzle with sauce last so it doesn’t get lost underneath everything else.

    Common Mistakes and How to Avoid Them

    Soggy sweet potatoes. This almost always comes down to overcrowding the pan. If the cubes are touching or stacked, they steam instead of roast, which leaves them soft all over instead of caramelized at the edges. Use two sheet pans if needed rather than forcing everything onto one.

    Dry, crumbly beef. Overcooking past the point of doneness, or using very lean beef without added fat, both lead to a dry result. Pull the beef off the heat as soon as it’s fully browned with no pink remaining — there’s no benefit to cooking it longer once it’s done.

    Bland bowls. Because there’s no bun or sauce-soaked bread to carry flavor, seasoning the beef and sweet potatoes properly matters more here than in a traditional burger. Don’t skip the seasoning on the sweet potatoes just because they’re going in the same bowl as well-seasoned meat — undersalted components make the whole bowl taste unfinished.

    Unevenly cut sweet potato cubes. Larger pieces take noticeably longer to cook through than smaller ones, so if the cubes vary a lot in size, you’ll end up with some mushy pieces and some still firm in the center. Aim for consistency when cutting, even if it takes an extra minute or two.

    Serving Suggestions

    This bowl is substantial enough to serve as a full meal on its own, but it also pairs well with a simple green salad or a side of roasted vegetables if you’re feeding bigger appetites. For a more indulgent version, add a fried egg on top — the runny yolk acts almost like a sauce once it breaks over the warm beef and sweet potatoes. For a lighter take, skip the cheese and sour cream and lean on avocado, pickled onion, and a squeeze of lime instead.

    If you’re serving a group with different preferences, consider setting out the components separately — sweet potatoes, beef, and a few topping options — so everyone can build their own bowl.

    Storage and Reheating

    Store leftover sweet potatoes and ground beef separately in airtight containers in the refrigerator for up to four days. Keeping them apart helps the sweet potatoes hold their texture better, since mixing them with the beef right away can make them soften further as they sit.

    To reheat, warm the sweet potatoes and beef separately in a skillet over medium heat until heated through, or microwave them in short intervals, stirring in between. Fresh toppings like lettuce, avocado, and tomatoes are best added right before eating rather than stored with the leftovers, since they wilt or discolor quickly once combined with warm food.

    This dish isn’t a strong candidate for freezing as an assembled bowl — the sweet potato texture suffers after freezing and thawing — but the cooked, seasoned ground beef on its own freezes reasonably well for up to about two to three months in an airtight, freezer-safe container.

    Frequently Asked Questions

    Can I make the sweet potatoes ahead of time?
    Yes. Roast them up to two days ahead, store in the refrigerator, and reheat in a hot oven or skillet to help re-crisp the edges before serving, since microwaving alone tends to leave them soft throughout.

    Is this recipe gluten-free?
    Yes, as written. Just double-check that any Worcestershire sauce or pre-made burger sauce you use doesn’t contain gluten-based additives, since formulations vary by brand.

    Can I use frozen sweet potato cubes instead of fresh?
    You can, though frozen cubes release more moisture as they cook and generally won’t caramelize as deeply as fresh ones. If using frozen, pat them dry before roasting and expect a slightly softer texture.

    What can I use instead of ground beef if I want a leaner option?
    Ground turkey or lean ground chicken both work well; just add a small amount of oil to the pan to help prevent sticking and dryness, and cook until the internal temperature reaches 165°F (74°C).

    Final Thoughts

    A sweet potato burger bowl works because it takes everything satisfying about a classic burger — savory seasoned beef, crisp and tangy toppings, a hearty base — and rebuilds it without bread, making it easy to adapt for different diets and appetites. Once you’ve got the basic method down, it’s less a fixed recipe than a flexible format: swap the protein, change the toppings, adjust the seasoning, and you’ve got a different meal using the same simple technique.

  • 20 Halloween Dessert Ideas: Easy, Spooky, and Crowd-Pleasing Sweets

    20 Halloween Dessert Ideas: Easy, Spooky, and Crowd-Pleasing Sweets

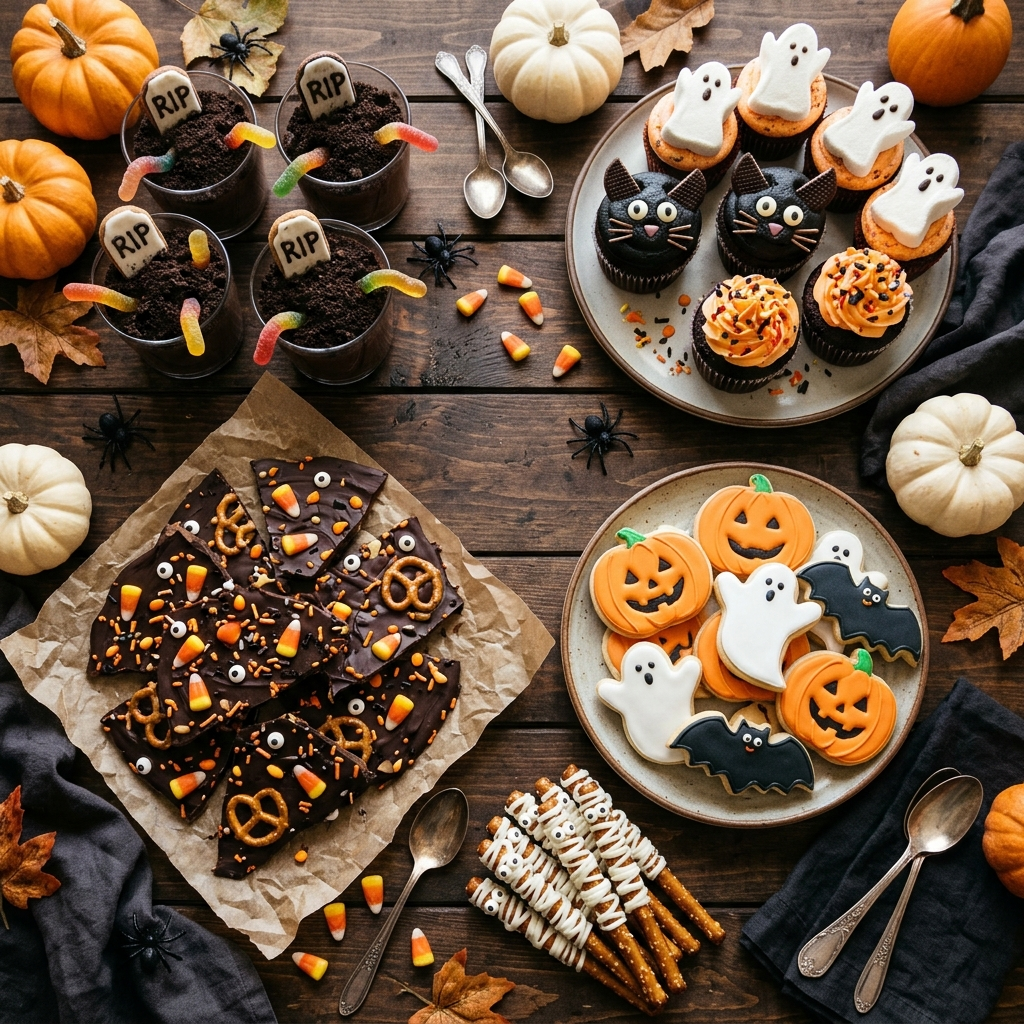
    Dessert is usually the easiest way to make a Halloween spread feel festive without a lot of extra work. A plain batch of brownies becomes a “graveyard” with a few cookie crumbs and a plastic spider; a bowl of chocolate pudding turns into “dirt” with the same crumbs on top. The theming is often more about presentation than technique, which makes Halloween dessert ideas a great category for beginner bakers and busy parents alike.

    This roundup collects 20 halloween dessert recipes organized by how much effort they take and who they’re for — quick no-bake treats, classic baked desserts with a spooky twist, kid-friendly options, more polished choices for adult parties, and a dessert charcuterie board that works as a centerpiece rather than individual servings. Each entry explains what makes it worth making, not just what it’s called, along with practical notes on timing and substitutions so you can build a dessert table that matches your schedule and your guest list.

    How to Choose the Right Mix for Your Dessert Table

    Before diving into the list, it’s worth thinking about balance the same way you would with any party spread. A table of all-chocolate desserts gets heavy fast, and an all-no-bake lineup can feel a little one-note in texture. A good halloween dessert table usually includes something chocolate, something fruity or lighter, something crunchy, and at least one item kids can help assemble themselves.

    For a party of 10 to 15 guests, two to three dessert options with enough quantity for two to three small bites each tends to cover most appetites, especially if the dessert table follows a full dinner or heavy appetizers. If dessert is the main event — a kids’ Halloween party, for instance — four or five different treats gives guests enough variety to graze without overordering ingredients.

    Easy No-Bake Halloween Desserts

    No-bake treats are the fastest route to a finished dessert table, since there’s no oven timing to manage and most of them can be made well ahead.

    1. Oreo Dirt Pudding Cups. Layer chocolate pudding with crushed Oreo cookies in clear cups, finishing with a few more crumbs on top and a gummy worm poking out. The clear cup is what sells the “dirt” effect, so resist the urge to use opaque bowls here. These hold well in the fridge for a day or two, making them one of the easiest make-ahead options on this list.

    2. Candy Corn Rice Krispie Treats. Tint a classic Rice Krispie treat mixture in batches with yellow and orange food coloring, then layer the colors in a pan before cutting into triangles to mimic candy corn. The marshmallow base sets quickly at room temperature, so this is a good one to make the same afternoon as your party.

    3. Mummy Pretzel Bites. Melt white chocolate or white candy melts and drizzle it back and forth over pretzel rods or pretzel rounds to create a “wrapped” effect, leaving a small gap for two mini chocolate chip eyes. The key is working while the chocolate is still warm and fluid — it firms up fast, so have your eyes ready to place before you start drizzling.

    4. Chocolate-Dipped Banana Ghosts. Dip banana halves in melted white chocolate, add chocolate chip eyes while the coating is still wet, and freeze until set. The banana adds natural sweetness and a cold, slightly chewy texture once frozen, which makes these feel more like a frozen treat than a typical candy-heavy dessert.

    5. Spiderweb Cheesecake Dip. Blend softened cream cheese with powdered sugar and a splash of vanilla, spread it into a shallow dish, then pipe a thin spiral of melted chocolate on top and drag a toothpick outward to form a web. Serve with graham crackers or apple slices. It’s essentially a dessert version of the spiderweb hummus trick, and it comes together in well under fifteen minutes.

    Classic Baked Halloween Desserts With a Spooky Twist

    These recipes rely on baking, but the techniques are familiar — the Halloween element comes from shaping, coloring, or decorating a dessert you likely already know how to make.

    6. Graveyard Brownies. Bake a batch of brownies, let them cool completely, then press in a few store-bought cookie “tombstones” (rectangular cookies with piped icing lettering) and scatter crushed chocolate cookie crumbs around them to look like dirt. Cooling the brownies fully before decorating matters here — warm brownies will melt the icing on your tombstones and blur the lettering.

    7. Black Cat Cupcakes. Frost chocolate or vanilla cupcakes with a swirl of dark frosting, then add two triangular pieces of chocolate for ears, white candy eyes, and a small pink candy nose. A simple buttercream swirl gives you enough surface to work with, so pipe it a little higher than you normally would to leave room for the face.

    8. Pumpkin Spice Blondies. Swap some of the butter in a standard blondie recipe for canned pumpkin purée and add pumpkin pie spice to the batter. The pumpkin keeps the blondies notably moist and adds a subtle earthy sweetness, while a light dusting of cinnamon sugar on top gives them a finished look without any Halloween-specific decorating at all.

    9. Meringue Ghosts. Pipe meringue into small ghost-shaped peaks on a parchment-lined tray, then bake low and slow — generally in the range of 200°F (around 95°C) for an hour or more, until the meringues are fully dry and lift cleanly off the parchment. Add two dots of melted chocolate for eyes once they’ve cooled. These are naturally gluten-free and have a light, crisp-shelled texture that’s a nice contrast to the heavier chocolate desserts on the table.

    10. Caramel Apple Slices. Core and slice apples into wedges rather than dipping them whole, then drizzle with melted caramel and a little melted chocolate. Slicing first solves the biggest frustration people have with traditional caramel apples — they’re far easier to eat and don’t require anyone to bite through a thick caramel shell.

    Fun and Cute Halloween Desserts Kids Will Love to Help Make

    These options work well for kids’ parties or for letting children help in the kitchen, since most of the steps involve assembly rather than precise technique.

    11. Jack-o’-Lantern Clementines. Peel clementines and add a small piece of green pepper or a parsley stem on top to mimic a pumpkin stem. No knife skills required, which makes this a good one to hand off to a younger helper.

    12. Monster Cookie Cups. Press sugar cookie dough into a muffin tin, bake until just set, and top with a swirl of green-tinted frosting, candy eyes, and a mouth of mini marshmallows or candy pieces. Because the dough is baked in a cup shape rather than flat, it holds toppings well without them sliding off.

    13. Ghost Marshmallow Pops. Dip marshmallows in melted white chocolate, place on a lollipop stick, and add two small dots of black gel icing for eyes once the coating has set slightly. These are quick enough for kids to assemble themselves with a little supervision around the melted chocolate.

    14. Candy Eyeball Bark. Spread melted chocolate (dark, milk, or white) onto a parchment-lined tray, scatter with candy eyeballs and crushed pretzels or nuts, then break into pieces once set. It’s one of the most forgiving recipes on this list — there’s no wrong way to scatter toppings, and leftover bark keeps well in an airtight container.

    15. Witch Hat Cookies. Stack a chocolate wafer cookie, a small dollop of frosting, and an upside-down ice cream sugar cone to build a witch’s hat shape, then add a thin ribbon of orange frosting around the base of the cone. The assembly is straightforward, though the cones can be fragile, so handle them gently when pressing them onto the frosting.

    Halloween Desserts for Adult Parties

    For a more grown-up gathering, these desserts lean on richer flavors and slightly more refined presentation while still keeping the Halloween theme visible.

    16. Black Velvet Cupcakes. A twist on red velvet made with black cocoa powder or a combination of black food coloring and regular cocoa, topped with cream cheese frosting. The deep, almost jet-black crumb makes a striking contrast against white frosting, and the flavor is close enough to classic red velvet that it doesn’t feel like a novelty item.

    17. Spiced Pumpkin Cheesecake Bars. A graham cracker crust topped with a pumpkin-spiced cheesecake layer, baked in a pan and cut into bars once fully chilled. Bars are easier to portion and transport than a full cheesecake, and the spice blend — cinnamon, ginger, nutmeg, clove — gives this a more autumnal flavor than a plain cheesecake would have.

    18. Chocolate Orange Tart. A dark chocolate ganache filling in a simple tart shell, flavored with a little orange zest or orange liqueur. The citrus cuts through the richness of the chocolate, and the color pairing happens to read as very on-theme for Halloween without any overt decoration needed.

    19. Salted Caramel Popcorn Clusters. Toss popped popcorn in a cooked caramel sauce with a finishing pinch of flaky salt, then let the clusters set on parchment before breaking apart. The caramel needs to reach a proper amber color — not pale, not burnt — for the right balance of sweetness and depth, so keep a close eye on it once it starts to color.

    Build a Halloween Dessert Charcuterie Board

    If you’d rather build one centerpiece than assemble several individual recipes, a halloween dessert board pulls together store-bought and homemade elements into a single spread that still feels intentional.

    20. Halloween Dessert Charcuterie Board. Start with a large board or tray and build outward from a central dip — the spiderweb cheesecake dip from earlier works well here. Surround it with a mix of textures and colors: pretzel rods, orange and black candy melts or M&Ms, mini cookies, caramel popcorn clusters, chocolate-covered pretzels, a few whole clementines, and small clusters of grapes for a lighter, fresher element. Grouping items by color and shape, rather than scattering randomly, is what makes a dessert board look styled instead of just assembled.
    A board like this is especially useful when you’re short on time, since it leans on a few homemade elements mixed with ready-made candy and fruit rather than requiring everything to be baked from scratch.

    Make-Ahead Tips and Storage for Halloween Desserts

    Most of the baked items on this list — brownies, blondies, cookies, bars — can be made a day or two ahead and stored in an airtight container at room temperature, which takes pressure off party day. Cheesecake bars and anything with a cream cheese or pudding base should go in the refrigerator and are generally best eaten within three to four days.

    No-bake treats involving melted chocolate, like the mummy pretzels or candy eyeball bark, hold up well at room temperature as long as your kitchen isn’t especially warm; in a hot house, refrigerating them keeps the chocolate from softening or developing a dull, streaky surface called bloom. Items with fresh fruit, like the chocolate-dipped banana ghosts or caramel apple slices, are best made the same day or the night before, since cut fruit will brown and caramel can start to weep moisture if it sits too long.

    If you’re assembling a dessert board, build it as close to party time as reasonably possible — within a few hours works well — so pretzels stay crisp and cut fruit stays fresh-looking.

    Frequently Asked Questions

    What’s an easy Halloween dessert for someone who doesn’t bake?
    No-bake options like Oreo dirt pudding cups, spiderweb cheesecake dip, or candy eyeball bark require no oven at all and come together with basic assembly skills, making them a reliable starting point for non-bakers.

    Can I make Halloween desserts gluten-free?
    Several recipes here are naturally gluten-free or easy to adapt, including meringue ghosts, candy eyeball bark, caramel apple slices, and chocolate-dipped banana ghosts. For baked items like brownies or blondies, a one-to-one gluten-free flour blend generally works as a substitute, though texture can be slightly more delicate.

    How far in advance can I decorate Halloween desserts?
    Decorating details like piped icing tombstones or candy eyes are best added once the base dessert has fully cooled, but can usually be done a day ahead if stored in an airtight container. Delicate decorations near melted chocolate are best added within a few hours of serving so they stay crisp and well-defined.

    What desserts work best for transporting to a Halloween party?
    Bars, cookies, and bark travel better than anything with soft frosting swirls or delicate piping, since they’re less likely to shift or smear in transit. If you’re bringing a frosted item, chilling it briefly before transport helps the frosting firm up.

    Final Thoughts

    Halloween desserts don’t require special equipment or advanced baking skills — most of what makes these treats feel festive comes down to color, a few candy details, and simple shaping rather than complicated technique. Start with one or two no-bake options if you’re short on time, add a baked favorite you already know how to make well, and round things out with something kids can help decorate. That combination covers a wide range of tastes and schedules without turning dessert into the most stressful part of your Halloween party planning.

  • Halloween Appetizers: Easy, Spooky, and Crowd-Pleasing Recipes for Any Party

    Halloween Appetizers: Easy, Spooky, and Crowd-Pleasing Recipes for Any Party

    Halloween parties have a way of sneaking up on hosts. Between costumes, decorations, and candy logistics, the food often gets planned last — and appetizers tend to suffer most, since they need to look festive, feed a crowd, and still taste genuinely good. A plate of food that’s all theme and no flavor falls flat fast, especially once the candy corn has worn off everyone’s palate.

    This guide pulls together a full range of halloween appetizers, from five-ingredient dips you can throw together after work to spooky showstoppers that make a dinner table look like a haunted buffet. You’ll find options sorted by what actually matters when you’re planning a party: how much hands-on time they take, whether kids will eat them, which ones work for gluten-free guests, and which ones lean more toward grown-up flavors like buffalo, garlic, and smoked paprika. Along the way, there’s practical guidance on portioning, make-ahead timing, and keeping food safe on a buffet table for hours of trick-or-treat chaos.

    What Makes a Halloween Appetizer Spread Actually Work

    Before getting into specific recipes, it helps to think about the spread as a whole rather than picking dishes one at a time. A good halloween party food lineup usually balances a few things at once.

    First, mix temperatures and textures. A table full of cold dips gets monotonous, and an all-hot menu means you’re tied to the oven all evening. Aim for at least one hot item, one cold dip or spread, and a few room-temperature finger foods that can sit out comfortably.

    Second, plan for roughly four to six bite-sized pieces per guest if appetizers are the main food, or two to three pieces per guest if you’re also serving a meal. This isn’t an exact science — heavier eaters and longer parties push that number up — but it keeps you from either running out by 8 p.m. or throwing away trays of food.

    Third, keep food safety in mind, especially for a party that might stretch over several hours while kids are in and out trick-or-treating. Perishable dips, anything with mayonnaise or dairy, and meat-based bites shouldn’t sit at room temperature longer than about two hours. If your gathering runs long, plan to refresh platters from the fridge rather than leaving one batch out the entire night.

    A Quick Map of What’s Ahead

    To make this easier to navigate, the recipes below are grouped into five categories:

    • Easy dips and spreads for a crowd
    • Finger foods and handheld bites
    • Cute, kid-friendly options
    • Spooky showstoppers for adult-leaning parties
    • Gluten-free halloween appetizers

    Skip to whichever section matches what you’re planning, or pull a few ideas from each to build a full table.

    Easy Dips and Spreads for a Halloween Crowd

    Dips are the backbone of most halloween party appetizers because they’re forgiving, scalable, and easy to make ahead. The theming usually comes from presentation rather than the recipe itself, which means you can lean on dips you already know work.

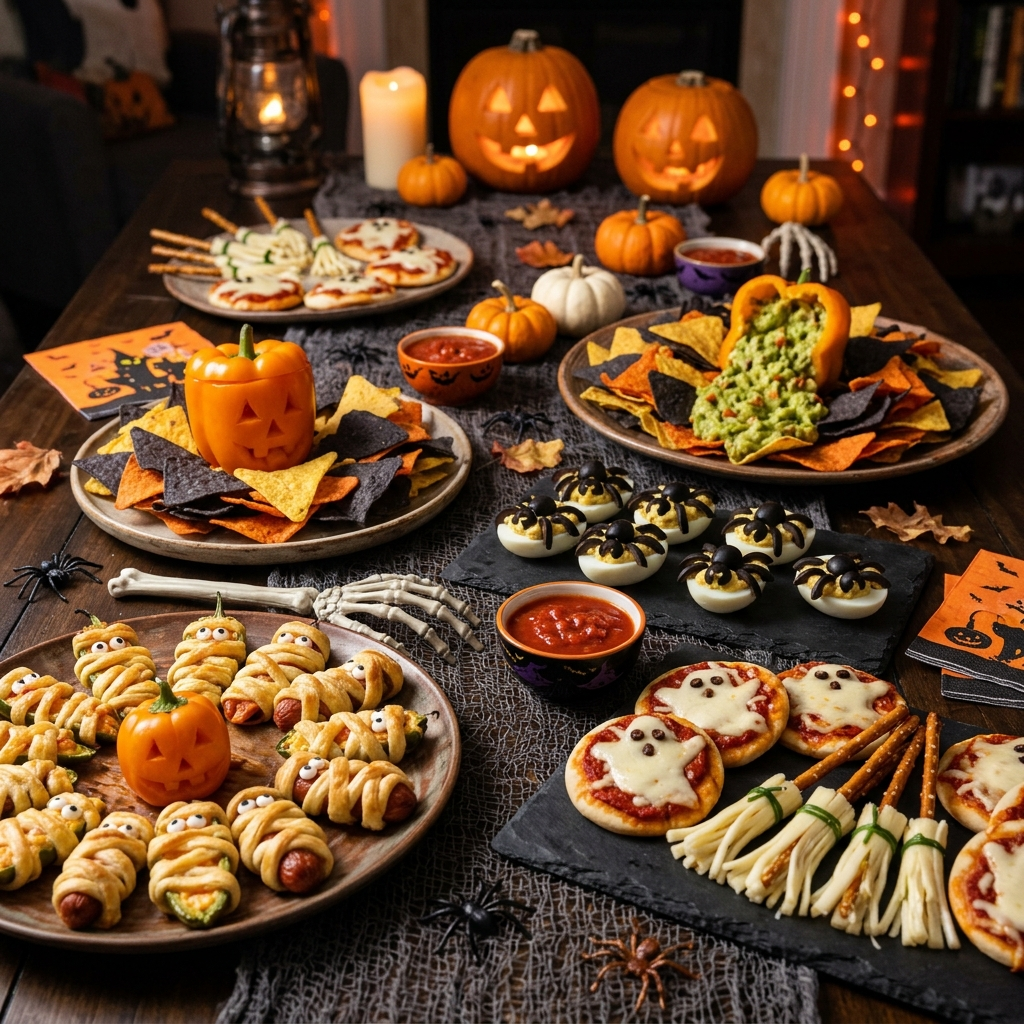
    Spiderweb Hummus. Spread store-bought or homemade hummus in a shallow dish, then pipe thin concentric circles of sour cream or tahini on top. Drag a toothpick from the center outward in several spots to pull the circles into a web pattern. It takes about two minutes and turns an ordinary hummus bowl into one of the easiest halloween themed appetizers on this list. Serve with pita chips, carrot sticks, or black tortilla chips for extra contrast.

    Pumpkin Queso Dip. Stir a small amount of canned pumpkin purée into warm queso or a basic cheese-and-tomato dip. The pumpkin adds color and a faint earthy sweetness without overpowering the cheese, and it keeps the dip loose enough for dipping even after it cools slightly. This one is best served warm, so plan to make it close to party time or keep it on a low setting in a slow cooker.

    Buffalo Chicken Dip in a Bread Bowl. Hollow out a round boule, fill it with classic buffalo chicken dip, and set the scooped-out bread cubes around it for dipping. Calling the loaf a “cauldron” is optional, but it’s an easy way to dress up a dip that’s already a party favorite. This is a hot dip, so keep it in mind for the oven-timing portion of your menu.

    Black Bean Dip with Olive “Spiders.” A simple black bean dip — black beans, lime, cumin, garlic, blended until mostly smooth — gets a Halloween touch with whole or halved olives arranged as spiders on top. It’s naturally dairy-free and holds up well at room temperature, which makes it a practical choice if your buffet needs to survive a couple of hours without supervision.

    Halloween Finger Foods and Handheld Bites

    Finger foods are the most practical category for a party where guests are standing, mingling, or juggling a drink in one hand. These halloween finger foods appetizers travel well and don’t require plates or utensils.

    Mummy Pigs in a Blanket. Wrap cocktail sausages or mini hot dogs in thin strips of crescent or puff pastry dough, leaving a small gap near one end for two dots of mustard “eyes.” Bake until the pastry is golden and puffed — usually in the 12 to 15 minute range at the temperature listed on your dough package, though exact timing depends on the brand you use. These disappear fast at kid-heavy parties.

    Spiderweb Deviled Eggs. Classic deviled eggs get a Halloween update with a thin spiral of sriracha mayo or black sesame paste drawn into a web pattern on top, or with a small olive cut to resemble a spider. The filling itself doesn’t change — yolks, mayonnaise, mustard, a little vinegar — so this is really a presentation trick layered onto a recipe most people already make well.

    Graveyard Cheese and Charcuterie Board. Arrange cheese, crackers, and cured meats on a board, then add a few rectangular cheese “tombstones” (cut from firm cheese like cheddar) with piped cream cheese lettering, plus pretzel stick “fences” and a scattering of crushed Oreo “dirt” around the edges. It’s one of the more flexible halloween appetizers for a party since it scales up or down with your guest count and lets people build their own bites.

    Caprese Eyeball Skewers. Thread a cherry tomato and a small mozzarella ball onto a toothpick, then press a sliced black olive into the mozzarella to look like a pupil. A drizzle of balsamic glaze finishes it off. These are naturally gluten-free, require no cooking, and can be assembled well ahead of time.

    Cute Halloween Appetizers Kids Will Actually Eat

    Spooky doesn’t always land with younger guests, so it helps to have a few genuinely cute halloween appetizers that are more charming than creepy. These lean on fruit and familiar flavors rather than unusual textures.

    Banana Ghosts. Cut bananas into short lengths, stand them upright, and add two mini chocolate chips for eyes and a small oval chip or sliver of chocolate for a mouth. They’re ready in minutes and need no cooking, which makes them an easy option when kids want to help assemble the food themselves.

    Clementine Pumpkins. Peel clementines or small mandarins and press a short piece of celery or a pretzel stick into the top to mimic a pumpkin stem. It’s barely a recipe, but it’s consistently one of the easiest halloween appetizers for a party with young kids, and it adds a lighter, fruit-based option next to heavier dips and pastries.

    Mozzarella Ghost Crackers. Use a small round cutter or a knife to shape thin mozzarella slices into ghost outlines, then set them on crackers and add two tiny dots of black olive or nori for eyes. Mild and familiar, these work well for kids who are wary of anything too visually “spooky.”

    Spooky Showstoppers for Grown-Up Halloween Parties

    For an adult-focused gathering, you can lean further into the eerie side of Halloween without worrying about scaring off younger guests. These halloween appetizers for adults tend to use bolder flavors — garlic, herbs, smoked meats — alongside the visual theme.

    Witch Finger Sausage Rolls. Shape sausage meat or ground pork around a whole almond at one end (for the “fingernail”), wrap in puff pastry, and score shallow lines along the length to suggest knuckles before baking. A streak of ketchup near the almond adds a bloody finishing touch. These are heartier than most dips, so they work well if appetizers are standing in for dinner.

    Severed Finger Breadsticks.   A simpler variation on the same idea: shape breadstick dough into finger-like lengths, press an almond sliver into one end, and use a knife to score knuckle lines before baking. Serve with a bowl of marinara for “dipping in blood” — a line that tends to get a laugh from an adult crowd.

    Spiced Pumpkin Soup Shooters. Small glasses or shot cups of warm, well-seasoned pumpkin soup — built on sautéed onion, garlic, roasted pumpkin or squash, and stock, finished with a touch of cream — make an elegant, slightly unexpected addition to a Halloween spread. They’re easy to batch-make ahead and reheat gently before guests arrive.

    Gluten-Free Halloween Appetizers That Don’t Feel Like an Afterthought

    If you’re hosting guests who avoid gluten, it’s worth building a few dedicated options rather than hoping they’ll piece together a meal from garnishes. Several ideas above are naturally gluten-free, including the caprese eyeball skewers, clementine pumpkins, black bean dip, and spiderweb deviled eggs — just double-check that any crackers, chips, or breadsticks served alongside them are certified gluten-free if cross-contact is a concern.

    A few more worth adding specifically for this purpose:

    Veggie Spider Platter. Arrange carrot sticks, celery, and bell pepper strips radiating out from a central bowl of ranch or herbed yogurt dip, then set a few olives or cherry tomatoes with pretzel-stick legs (swap in gluten-free pretzels) around the platter as “spiders.” It’s colorful, crunchy, and doesn’t require any substitutions to the core vegetables.

    Stuffed Mini Pepper Pumpkins. Halve small orange bell peppers, remove the seeds, and fill with a mixture of cream cheese, shredded cheddar, and chopped herbs. The peppers themselves already look like tiny pumpkins once filled, so there’s very little extra styling needed.

    Prosciutto-Wrapped Melon. Wrap thin strips of prosciutto around cubes or balls of cantaloupe or honeydew. The salty-sweet combination is a reliable crowd-pleaser, and because there’s no bread or pastry involved, it’s an easy gluten-free addition that doesn’t feel like a substitution recipe.

    Make-Ahead Tips, Storage, and Food Safety for Halloween Buffets

    Most of the recipes above can be prepped partially or fully ahead of time, which matters on a night when you’re also managing decorations and costumes.

    Dips like hummus, black bean dip, and cheese boards can generally be assembled up to a day ahead and refrigerated, with any webbing or garnish details added just before serving so they stay crisp and defined. Pastry-wrapped items like the mummy pigs in a blanket or witch finger sausage rolls can be assembled and refrigerated raw, then baked fresh closer to serving time for the best texture — baked pastry that sits out for hours tends to turn soft rather than staying crisp.

    Fruit-based appetizers like banana ghosts are best made within an hour or two of serving, since cut bananas will brown. If you want to prep ahead, toss cut banana lightly in lemon or pineapple juice to slow discoloration.

    For food safety, keep an eye on how long dairy-based dips, deviled eggs, and meat items sit at room temperature. Two hours is the general guideline for perishable foods left out, and that window shortens in a warm room. If your party runs longer, refrigerate extra batches and swap out platters partway through rather than leaving one tray out for the entire evening.

    How to Build a Balanced Halloween Appetizer Menu

    With so many options, it helps to narrow things down with a simple framework. For a typical party of 10 to 15 guests, one dip, two or three finger foods, and one sweeter or fruit-based option usually covers the range of tastes in the room without overwhelming your kitchen. If kids and adults are both attending, include at least one item from the cute, kid-friendly category and one from the spookier, adult-leaning category, so neither group feels like an afterthought.

    If you’re short on time, prioritize recipes that require no baking — the dips, skewers, and fruit-based bites — and save the oven for one standout hot item rather than trying to bake everything at once.

    Frequently Asked Questions

    How many appetizers should I plan per person for a Halloween party?
    A reasonable starting point is four to six bite-sized pieces per guest if appetizers are the main food for the evening, or two to three pieces per guest if a full meal is also being served. Adjust upward for a longer party or a crowd that skews toward bigger appetites.

    Can I make Halloween appetizers the night before?
    Many can, especially dips, cheese boards, and anything that doesn’t rely on fresh-cut fruit or crisp pastry. Store them covered in the refrigerator and add any delicate garnishes — like piped sour cream webs or olive spiders — closer to serving time so they look fresh.

    What are good non-candy Halloween snacks for kids at a party?
    Fruit-based options like clementine pumpkins and banana ghosts, along with mild items like mozzarella ghost crackers, tend to appeal to kids without relying on sugar. Pairing them with a simple veggie platter rounds things out.

    How do I keep appetizers from drying out on a buffet table?
    Cover trays loosely with plastic wrap until close to serving time, and refresh platters partway through the party rather than setting everything out at once. Dips in particular can form a skin if left uncovered too long, so keep a lid or wrap handy between servings.

    Final Thoughts

    A strong Halloween appetizer table doesn’t need to rely on complicated recipes or elaborate decorating skills — most of the ideas here use familiar dishes with a few small, deliberate touches that make them feel occasion-specific. Pick a handful that match your guest list, lean on the make-ahead tips to keep your night manageable, and round things out with at least one dip, one handheld bite, and one option that works for both kids and adults. That mix tends to carry a party far more reliably than any single showstopper dish.