
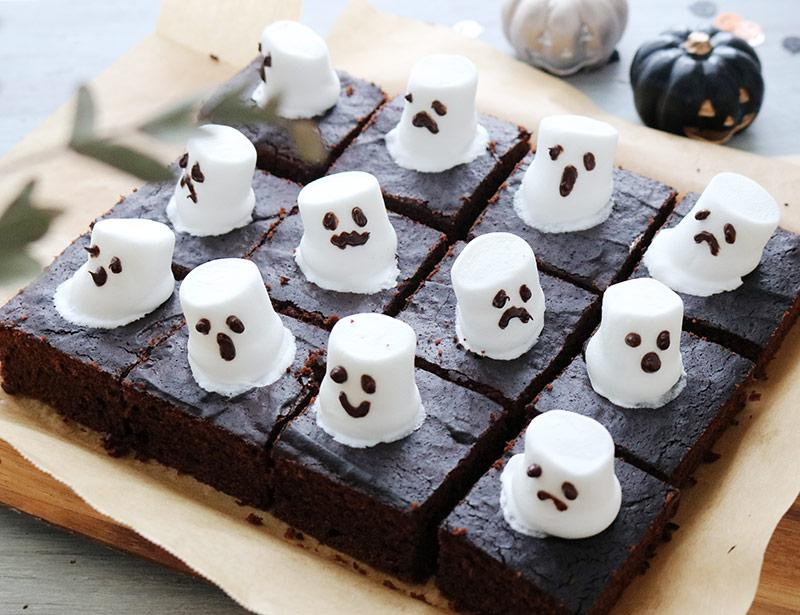
The best part is that you don’t need complicated decorating skills or special baking equipment to make them. Start with a homemade batch of chocolate brownies, let them cool, and transform each square into a ghost-themed treat using white chocolate or marshmallow decorations.
These brownies are perfect for Halloween parties, school celebrations, family movie nights, bake sales, and autumn gatherings. Children can also help decorate the ghosts, making this a fun baking activity to enjoy together.
Whether you’re preparing a Halloween dessert table or simply looking for an easy spooky treat, these ghost brownies combine familiar chocolate flavor with a festive appearance that is sure to attract attention.
Why You’ll Love These Halloween Ghost Brownies
There are plenty of Halloween desserts to choose from, but these brownies have a combination of qualities that makes them especially appealing.
-
Rich and chocolatey: The brownie base is designed to be soft, moist, and fudgy rather than dry or cake-like.
-
Easy Halloween decoration: White chocolate or marshmallow ghosts make an ordinary brownie look festive without requiring advanced decorating skills.
-
Great for parties: Cut them into individual squares so guests can easily pick one up.
-
Kid-friendly baking activity: Children can help add the ghost decorations and chocolate eyes with adult supervision.
-
Make-ahead friendly: Bake the brownies ahead of time and decorate them closer to serving.
You can also customize the ghost expressions. Give some ghosts two tiny eyes, others a surprised mouth, or make a few playful faces to give the brownie tray more personality.
Ingredients You’ll Need

The ingredients for these Halloween brownies are straightforward. Most are common baking staples, while the white chocolate or marshmallows create the ghost decorations.
For the Brownies
-
1/2 cup (113 g) unsalted butter: Gives the brownies richness and helps create a soft, fudgy texture.
-
4 oz (113 g) semi-sweet chocolate: Adds deep chocolate flavor. Choose good-quality baking chocolate for a better result.
-
1 cup (200 g) granulated sugar: Sweetens the brownie batter and contributes to its texture.
-
2 large eggs: Help bind the ingredients and give the brownies structure.
-
1 teaspoon vanilla extract: Adds warmth and complements the chocolate.
-
1/2 cup (50 g) unsweetened cocoa powder: Deepens the chocolate flavor.
-
3/4 cup (95 g) all-purpose flour: Provides the structure needed for brownies that hold their shape when sliced.
-
1/4 teaspoon salt: Balances the sweetness and enhances the chocolate flavor.
For the Ghost Decorations
-
8–12 large white marshmallows or marshmallow ghosts: These can form the bodies of the ghosts.
-
1/2 cup (85 g) white chocolate chips or melting wafers: Useful for creating a white coating or additional ghost shapes.
-
Melted dark chocolate: For drawing the eyes and mouths.
-
A little coconut oil, optional: Helps thin white chocolate if needed.
A note about the decorations: You can use marshmallows for a quick, simple ghost topping or melted white chocolate for a more decorative finish. The method you choose will affect the final appearance and texture.
Kitchen Equipment
You don’t need a professional baking setup for this recipe. Gather these basic tools before starting:
-
An 8-by-8-inch (20-by-20-cm) square baking pan
-
Parchment paper
-
A medium saucepan or microwave-safe bowl
-
A mixing bowl
-
A whisk or hand mixer
-
A rubber spatula
-
Measuring cups and spoons or a kitchen scale
-
A toothpick or cake tester
-
A piping bag or small zip-top bag for decorating
Lining the baking pan with parchment paper is particularly helpful because it makes removing and slicing the brownies much easier.
How to Make Halloween Ghost Brownies
Follow these steps to make the brownies and decorate them with little white chocolate ghosts.
Step 1: Prepare the Baking Pan and Oven
Preheat your oven to 350°F (175°C). Line an 8-by-8-inch square baking pan with parchment paper, leaving a little extra hanging over two opposite sides.
The overhanging parchment will make it easier to lift the brownies out of the pan after baking. Lightly grease the parchment if needed.
Step 2: Melt the Butter and Chocolate

Place the butter and semi-sweet chocolate in a heatproof bowl. Melt them together using a microwave in short 20–30-second intervals, stirring between each interval.
You can also use a double boiler by placing the bowl over a saucepan of gently simmering water.
Stir until the mixture is completely smooth, then allow it to cool slightly. You want it warm enough to remain fluid but not so hot that it cooks the eggs when added.
Step 3: Mix the Wet Ingredients

In a separate mixing bowl, whisk together the eggs, granulated sugar, and vanilla extract.
Whisk until the mixture looks smooth and slightly thickened. Slowly pour in the melted chocolate and butter mixture while stirring.
Continue mixing until the chocolate is evenly incorporated and the batter has a rich, glossy appearance.
Step 4: Add the Dry Ingredients

Sift or whisk together the cocoa powder, flour, and salt in another bowl.
Add the dry ingredients to the chocolate mixture and gently fold with a spatula until just combined.
Avoid overmixing. Once the flour disappears, stop stirring. Overworking the batter can make the finished brownies tougher rather than soft and fudgy.
Step 5: Bake the Brownies

Pour the brownie batter into your prepared baking pan. Use a spatula to spread it evenly into the corners.
Bake for approximately 22–28 minutes, checking toward the end of the baking time.
The edges should look set, while the center should remain slightly soft. Insert a toothpick into the middle. It should come out with a few moist crumbs rather than wet batter.
Avoid waiting until the toothpick comes out completely clean, as that can indicate overbaking.
Step 6: Cool and Cut the Brownies

Remove the pan from the oven and place it on a wire rack. Allow the brownies to cool completely before decorating.
This step is important because warm brownies can cause the white chocolate decorations to melt or slide.
Once cool, lift the brownies out using the parchment paper. Cut into nine equal squares using a sharp knife.
For cleaner edges, wipe the knife between cuts.
Step 7: Prepare the Ghost Toppings

Now comes the fun part!
Arrange the brownie squares on a parchment-lined tray. Place one large marshmallow in the center of each brownie.
Melt the white chocolate wafers according to the package instructions. If the coating is particularly thick, mix in a little coconut oil to help it flow smoothly.
Spoon the melted white coating over each marshmallow, allowing it to drip gently down the sides. The coating should cover the marshmallow and create a ghost-like shape.
You can also dip the marshmallows into the melted coating before placing them on the brownies, then use a spoon to add extra coating around the base.
Work with one ghost at a time so the coating doesn’t harden before you finish decorating.
Step 8: Add the Ghost Faces
Before the white chocolate completely sets, add two tiny chocolate chips or small dots of melted dark chocolate for the eyes.
For the mouth, use a toothpick dipped in melted chocolate or a small piping bag to create a tiny oval or surprised expression.
Give each ghost a slightly different face. Some can look happy, while others can have wide, surprised mouths.
Allow the decorations to set completely before transferring the brownies to a serving plate.
Step 9: Let Them Set and Serve
Allow the white chocolate coating to firm up at room temperature in a cool environment. If your kitchen is warm, refrigerate the brownies briefly until the decorations are set.
Once ready, arrange them on a Halloween serving tray. You can add mini pumpkins, Halloween sprinkles, or orange and black decorations around the brownies for a more festive presentation.
Your Halloween Ghost Brownies are ready to serve!
Tips for Making the Best Halloween Ghost Brownies
A few small details can make a noticeable difference in the final appearance and texture of your brownies.
Don’t decorate warm brownies. Always allow the brownie base to cool completely. Warm brownies can soften the chocolate coating and cause the marshmallow ghosts to slide.
Use melting wafers for easier decorating. White chocolate melting wafers or candy melts are generally easier to work with than ordinary white chocolate chips because they are formulated for coating and setting.
Keep the ghost shapes simple. You don’t need perfectly smooth decorations. Slightly uneven white chocolate drips can actually make the ghosts look more playful.
Don’t use too much white chocolate at once. A thick coating can hide the marshmallow shape and make the decorations unnecessarily heavy. Spoon on enough to cover each ghost.
Make the faces before the coating sets. Mini chocolate chips are easier to attach while the white coating is still slightly wet. Alternatively, use melted dark chocolate after the coating has firmed.
Use parchment paper underneath. Some white chocolate may drip onto the tray while decorating. Parchment makes cleanup much easier.
Fun Ways to Customize Your Halloween Brownies
One of the best things about these brownies is how easily you can change their appearance. If you’re preparing a Halloween dessert table, consider creating a few variations.
-
Funny ghost brownies: Give the ghosts big eyes and open mouths to create surprised expressions.
-
Mini ghost brownies: Cut the brownie base into smaller squares and use mini marshmallows for smaller decorations.
-
Chocolate chip brownies: Fold extra chocolate chips into the batter before baking for additional chocolate pockets.
-
Halloween sprinkle brownies: Add orange, purple, and black sprinkles around the ghosts.
-
Spooky ghost brownies: Use darker chocolate expressions with narrow eyes and small mouths for a more mysterious appearance.
-
Peanut butter brownies: Add small spoonfuls of peanut butter to the batter and gently swirl before baking. Check peanut allergies before serving.
You can also use a combination of ghost brownies, mummy brownies, and spiderweb brownies on the same dessert platter to create a more interesting Halloween display.
What to Serve with Halloween Ghost Brownies
These brownies are rich and sweet, so they pair nicely with drinks and lighter treats.
-
Cold milk: A classic pairing that complements the chocolate flavor.
-
Hot chocolate: Perfect for a cozy Halloween movie night.
-
Vanilla ice cream: Serve a brownie with a small scoop for a more indulgent dessert.
-
Fresh strawberries: Their slight tartness balances the richness of the brownies.
-
Coffee: A cup of coffee works particularly well for adults who enjoy dark chocolate desserts.
For a Halloween party, arrange the brownies alongside Halloween sugar cookies, chocolate-covered strawberries, caramel popcorn, and other spooky treats.
How to Store Halloween Ghost Brownies
Store leftover brownies in an airtight container. Because the decorations contain marshmallows and chocolate, their texture may change depending on the room temperature.
-
Room temperature: If your kitchen is cool and the ingredients and coating are suitable for room-temperature storage, keep them in a sealed container for a short period.
-
Refrigerator: For longer storage, refrigerate in an airtight container. Allow them to sit briefly before serving if you prefer a softer brownie texture.
-
Freezer: The undecorated brownie base can be frozen in an airtight freezer-safe container, with parchment between layers. Thaw before adding the ghost decorations.
For the best appearance, decorate the brownies on the day you plan to serve them or shortly beforehand. Keep them away from heat and direct sunlight so the white chocolate doesn’t soften.
Frequently Asked Questions
1. Can I use a boxed brownie mix for Halloween Ghost Brownies?
Absolutely! A boxed brownie mix is a convenient shortcut when you’re short on time. Prepare it according to the package instructions, bake in the recommended pan, and allow it to cool completely before adding the marshmallow ghosts.
2. How do I make ghost decorations without marshmallows?
You can pipe small ghost shapes using white buttercream or royal icing. Another option is to use white chocolate to create ghost-shaped decorations on parchment paper, allow them to set, and carefully place them on the brownies.
3. Can I make Halloween Ghost Brownies ahead of time?
Yes. You can bake the brownie base a day ahead, allow it to cool, and store it in an airtight container. Add the ghost decorations closer to serving time for the best appearance.
4. Why is my white chocolate too thick for decorating?
White chocolate can become thick if overheated or if moisture gets into it. Use gentle heat and stir frequently. If necessary, add a small amount of coconut oil or use white chocolate melting wafers designed for coating.
5. How do I stop the marshmallows from falling off?
Place each marshmallow on a small dab of melted white chocolate or candy coating. Allow it to grip the brownie before covering the marshmallow with the remaining coating.
6. Can children help make these brownies?
Yes! Children can help add chocolate eyes, create ghost expressions, and arrange the finished brownies. Adults should handle the oven, hot melted chocolate, and sharp knives.
Final Thoughts
Halloween Ghost Brownies are a fun way to turn an ordinary chocolate dessert into something special for the spooky season. With their fudgy brownie centers, fluffy marshmallow toppings, and adorable white chocolate ghost faces, they’re just as enjoyable to decorate as they are to serve.
Whether you’re making them for a Halloween party, a school celebration, or a family movie night, these little ghost treats are a simple way to add something memorable to your dessert table.
Make a batch, give every ghost its own funny expression, and enjoy a deliciously spooky Halloween!
Leave a Reply